Non-US Residents: A Step-by-Step 2025 Guide
Stripe not available in your country? Our 2025 visual guide shows non-US founders how to legally open a verified account with a US LLC. Learn the exact requirements.
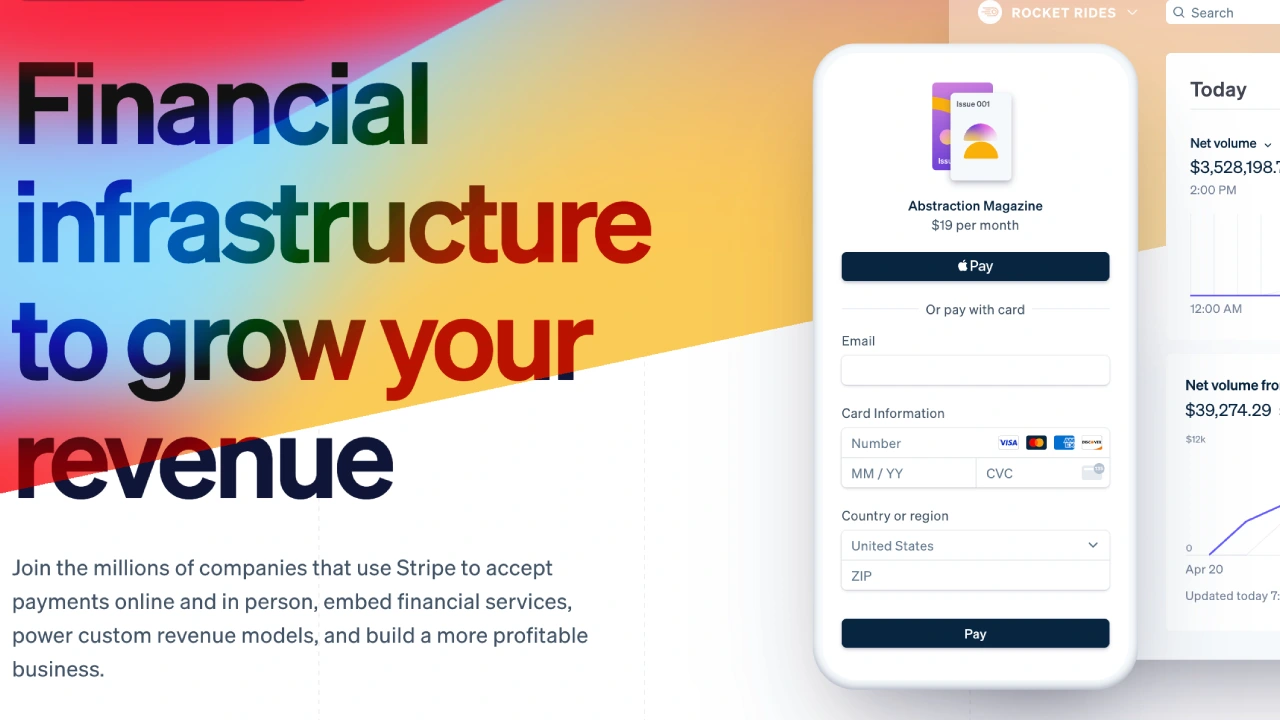
- Setting up a Stripe account is a crucial step for entrepreneurs aiming to sell products, offer services, or run SaaS businesses globally, but direct access isn’t available in every country.
- For non-US residents in unsupported countries, forming a US Limited Liability Company (LLC) is a legitimate and widely used pathway to access Stripe.
- Essential requirements include a US LLC, an Employer Identification Number (EIN), a US business bank account, a US phone number, and a compliant website.
- The Stripe application process involves verifying your personal identity (using your local ID) and your US business details.
- While Stripe’s interface may evolve, the core requirements and verification steps generally remain consistent. This guide reflects the latest understanding.
- Patience and attention to detail are key, especially when providing information for both your US entity and your personal details as a non-US resident.
Quick Note:
While Stripe’s application interface updates frequently, the fundamental requirements and process remain consistent. This guide reflects the latest changes.
Ready? Let’s embark on the journey to opening your Stripe account and unlocking international payment acceptance!
Why Do You Need to Open a Stripe Account?
Relying solely on local POS (Point of Sale) systems can be problematic when dealing with global customers and different currencies, especially if you’re in a country not directly supported by major international gateways. Common issues encountered with local payment systems include:
- Mandatory security measures (like 3D Secure for every transaction) that may not be familiar to international customers, leading to cart abandonment.
- Limited support for various international card types, resulting in failed orders.
- Inability to use platforms like Google Pay or Apple Pay.
- High commission rates or payment failures when processing transactions in different currencies.
- Limited integration and API capabilities.
- Lack of comprehensive documentation and slow customer support.
- Various other challenges faced by active e-commerce entrepreneurs.
Stripe, through its significant investments, has developed a robust ecosystem that overcomes many of these issues. This is why it’s considered one of the most preferred virtual POS systems globally.
Does Stripe Work if You’re Not in a Directly Supported Country?
Stripe does not approve individual accounts opened directly from many countries if they are not on its official list of supported nations. Stripe offers different types of accounts, including individual and corporate. While individual accounts are available in the US and some European countries, many other locations are not included.
How to Open Stripe Account for Non US Residents
Stripe doesn’t accept direct individual applications from unsupported countries. That’s accurate.
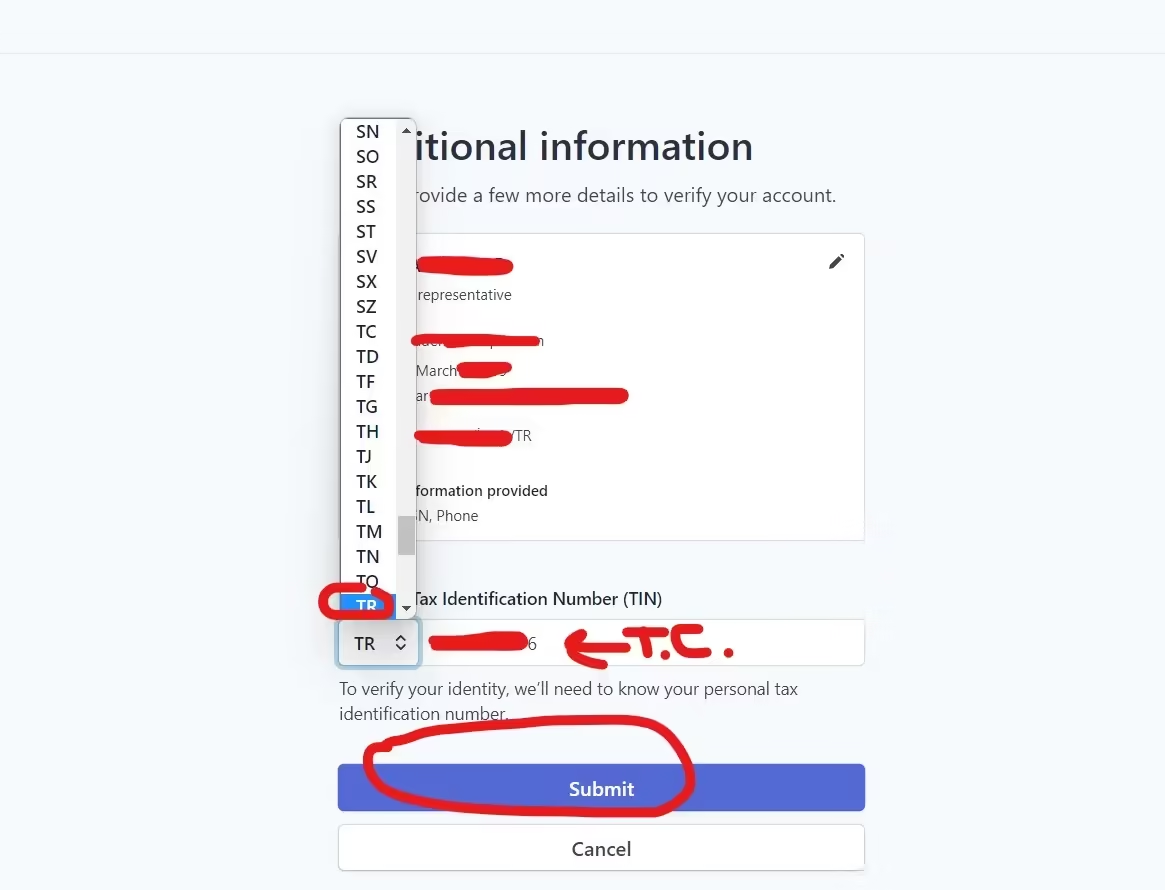
However, the situation changes if an individual resides in an unsupported country but owns a US LLC. Stripe fully supports account opening for US LLCs, even if the owner is a citizen of another country and resides elsewhere. This is because, during the personal information section of the application, there’s often a field for your local Tax Identification Number (TIN) or national ID, indicating Stripe accommodates non-US owners of US entities. The screenshot below (from a previous iteration of the form focusing on Turkish users, but illustrative of the principle) shows a field for “T.C.” (Turkish Republic) Tax ID number, demonstrating this capability for various nationalities.
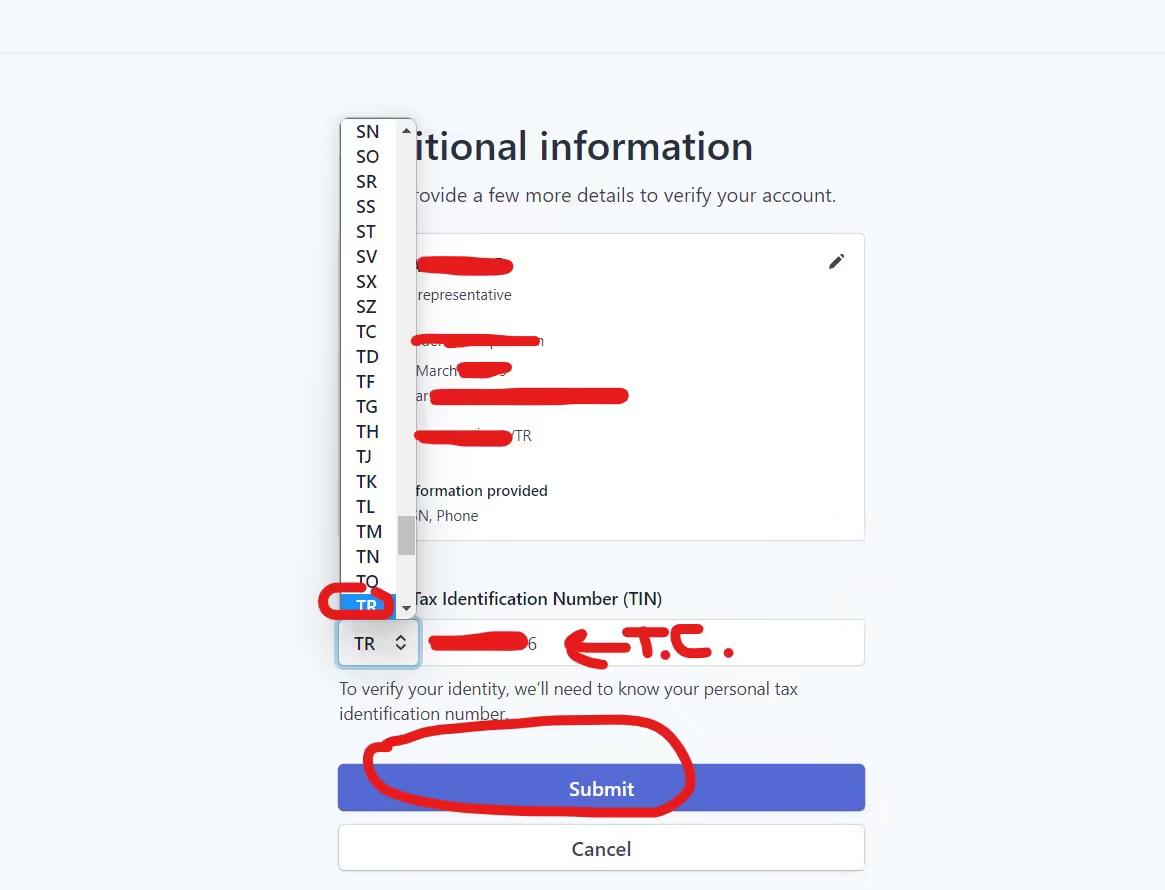
The presence of such a field for local tax ID is sufficient proof that Stripe is designed to work with non-US owners of US companies.
If Your Country Isn’t Directly Supported by Stripe, How Does it Accept Your Account (via a US LLC)?
It’s known that Stripe doesn’t support direct individual account opening from many countries. This can indeed cause confusion.
Without getting into excessive detail that might create more confusion, looking at Stripe’s own support documentation provides clarity. They explicitly state their requirements. According to Stripe:
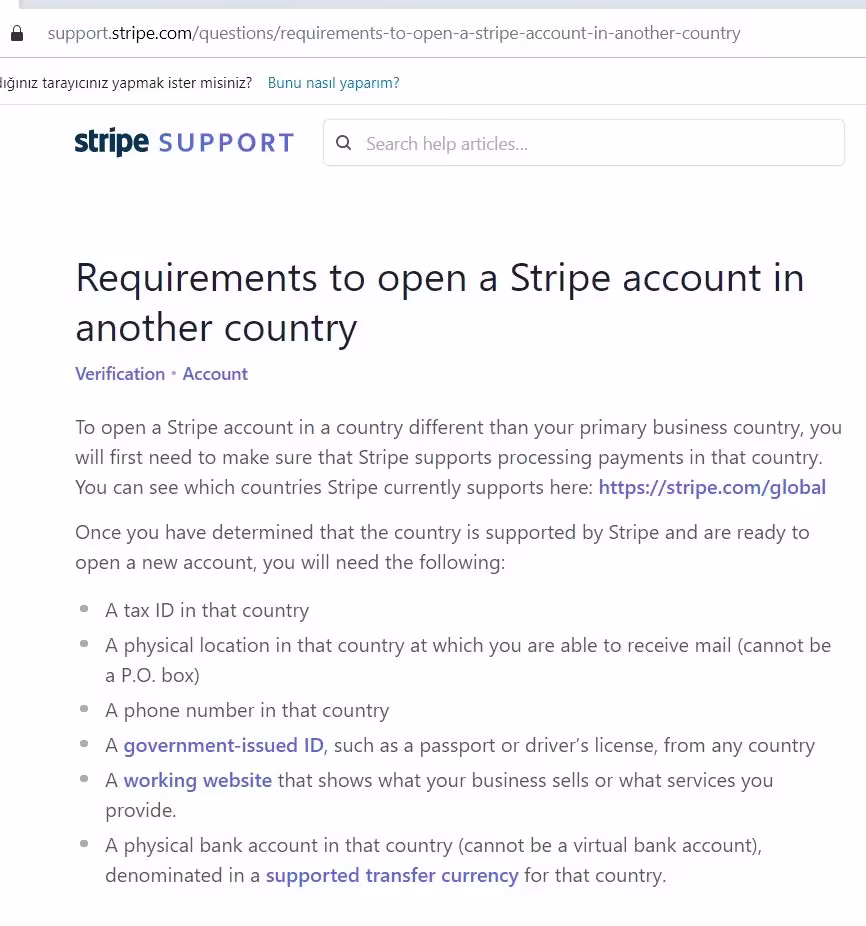
“To open a Stripe account in a country different than your primary business country, you will first need to make sure that Stripe supports processing payments in that country. You can see which countries Stripe currently supports here: https://stripe.com/global
Once you have determined that the country is supported by Stripe and are ready to open a new account, you will need the following:
• A tax ID in that country
• A physical location in that country at which you are able to receive mail (cannot be a P.O. box)
• A phone number in that country
• A government-issued ID, such as a passport or driver’s license, from any country
• A working website that shows what your business sells or what services you provide.
• A physical bank account in that country (cannot be a virtual bank account), denominated in a supported transfer currency for that country.”
If you want to open a Stripe account using a business entity from a specific country (in this case, the US), ensure Stripe supports that country. Since the US is a Stripe-supported country, owners of US LLCs, regardless of their own nationality or residency, can open an account.
Once you’ve confirmed that Stripe supports the country where your business is registered (the US), it’s time to look at the other requirements. Everything above is quite clear.
To open a Stripe account, your company needs to be in a Stripe-supported country. Since the US is among the supported countries, when you forming a company in the US, your company is domiciled in the US, and the problem of your personal country of residence not being directly supported is resolved for the business entity. To open a verified Stripe account, you need to form an LLC in the USA. Before attempting to open your Stripe account, you must follow the steps in relevant guides to form your company and obtain your Employer Identification Number (EIN). The most reliable and guaranteed way to open a Stripe account as a non-US resident is to form an LLC in the USA and then open a corporate account through Stripe.
Requirements to Open a Stripe Account (as a Non-US Resident with a US LLC)
- Company: A company registered in a supported country in the account holder’s name (a US-formed LLC is sufficient).
- Company Tax ID Number: An EIN is the tax identification number for a US LLC. It is obtained for free from the IRS after the company is formed.
- Physical Address Where Mail Can Be Received: It’s underlined that a virtual P.O. box won’t work. This refers to your company’s address in the US, not your personal residence. Your US Registered Agent address is generally accepted.
- Phone Number: A virtual phone number with a US area code can be obtained from providers like OpenPhone, OneSimCard, Zadarma, or Skype Business at a reasonable price.
- Government-Issued ID, Passport, or Driver’s License: A passport isn’t strictly necessary if you have a valid government-issued national ID card from your country of residence.
- A Functioning Website: This refers to a proper website in English, compliant with Stripe’s terms, detailing the legal business activities, and including pages for contact, terms, conditions, and about us. A list of prohibited businesses and website types can be found on Stripe’s website.
- A Bank Account Supporting the Currency Used in the Company’s Country of Operation: Refer to guides on opening a US bank account. Mercury Bank or Payoneer Business are sufficient for this purpose, as Stripe supports both platforms. Many of our readers have been using these solutions to receive payments via Stripe without interruption for a long time.
Assuming you have your company set up, there should be no obstacles. So, let’s detail how you can complete this process step-by-step and open a verified Stripe account.
Does Stripe Require Address Verification?
Since your company (the LLC) is based in the US, Stripe typically doesn’t require separate address verification for the business address beyond what’s formed during LLC formation and EIN application. They don’t need this because the crucial factors are the country where the company is located and the nationality/residency of the account opener.
Stripe already knows you may not live in the US because it allows you to enter your actual country of residence as your home address during the personal information stage. For Stripe, the important elements are the identity of the company owner, the company itself, a bank account, and the company’s EIN. Address verification for the business is not the primary concern in this setup.
Your Checklist Before Applying to Stripe:
- An LLC formed in any US state (as we’ll be opening the account from the US perspective for the business).
- The company’s formation documents (Certificate of Formation/Articles of Organization) are delivered to you after setup.
- An EIN (Federal Tax ID number) obtained after company formation.
- A US phone number.
- A functioning website (or e-commerce site) compliant with terms and preferably in English.
- A physical US bank account (Mercurybank or Payoneer Business).
Once you have these 6 items, you can open a verified and legal Stripe account and start receiving payments from your customers immediately. Now let’s detail how to implement these steps one by one.
Detailed Preparation Steps:
There are many alternatives on our website regarding this topic. However, to open your Stripe account most affordably, you can form your company in a state like New Mexico. You can set up your New Mexico LLC, including a US address, for around $89 with services like Northwest Registered Agent.
Form Your LLC with IncboosterAfter completing the company formation step, you need to get an EIN, or tax ID, for your company. Follow this article : How to Get an EIN for LLC (Note: Link to a future EIN guide)
Telecommunication systems like OneSimCard, Zadarma, or Skype Business handle this. Obtaining a virtual phone number with a US area code and activating it is sufficient.
We provided preliminary information on this topic above. Your website should be well-designed, with products/services listed, and all necessary pages (about us, privacy, policies, terms, conditions, contact) prepared. Pay attention to having your website’s primary language as English; opening it in English from the start will be beneficial to avoid approval issues.
Additionally, your business must comply with Stripe’s conditions. You can review the list of prohibited sectors here: Stripe’s prohibited businesses list
After your company is formed, you can open an online account remotely with MercuryBank or set up and use a Payoneer Business account. Both banks, once your USD account is active, are accepted by Stripe.
Guide: Open US Bank AccountAfter handling these 5 steps, the easiest part remains: opening the Stripe account. Without going into too much detail, let’s cover the steps on how a Stripe account will be opened.
Opening Your Stripe Account: Step-by-Step
Quick Tip:
Stripe constantly updates its registration form and approval processes during membership. There are no changes in requirements and other details, only minor visual changes in the account opening steps may occur. You don’t need to connect from a foreign IP address using VPN, VPS, etc. You can comfortably perform the operations from your own computer.
First, go to dashboard.stripe.com/register in your browser and fill out the form.
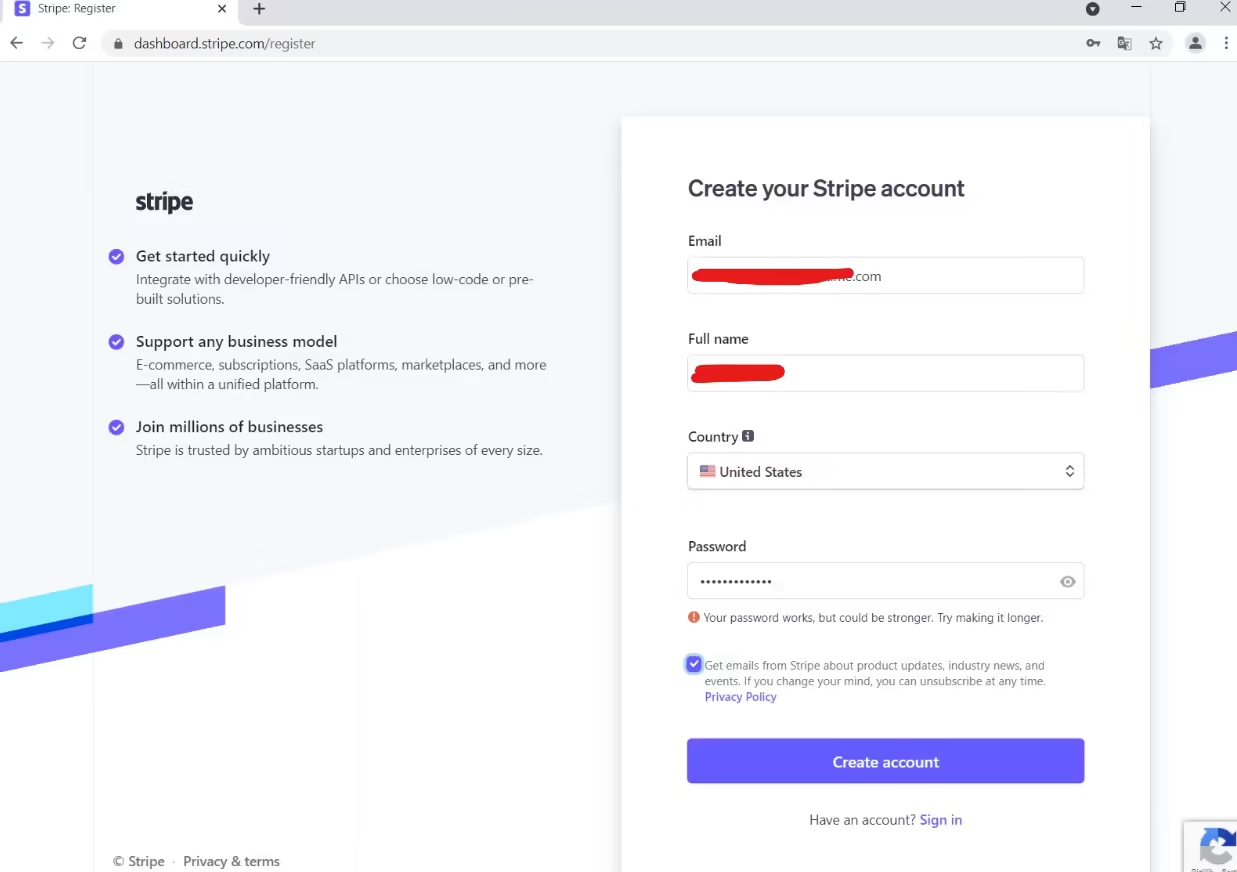
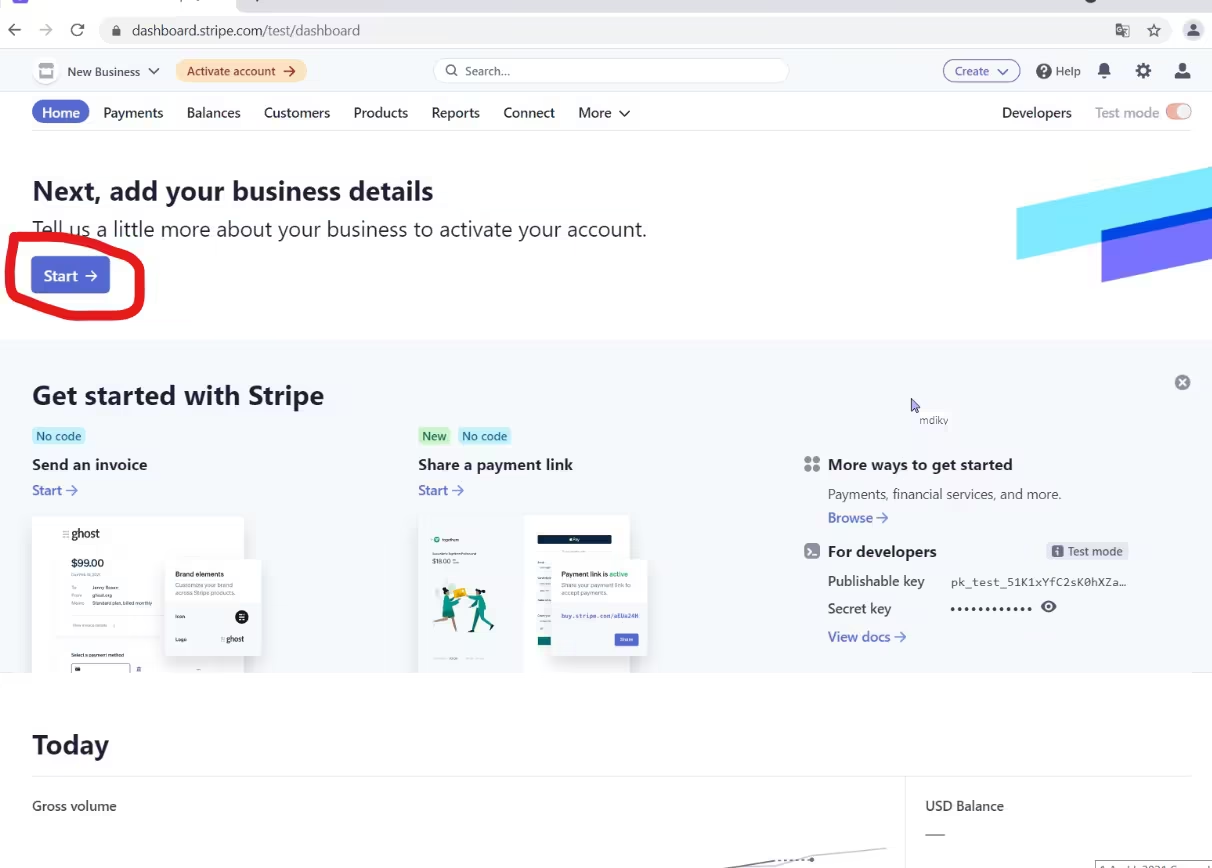
Click the “Start” button (or similar activation prompt after initial signup) to proceed with the steps required to activate your account.
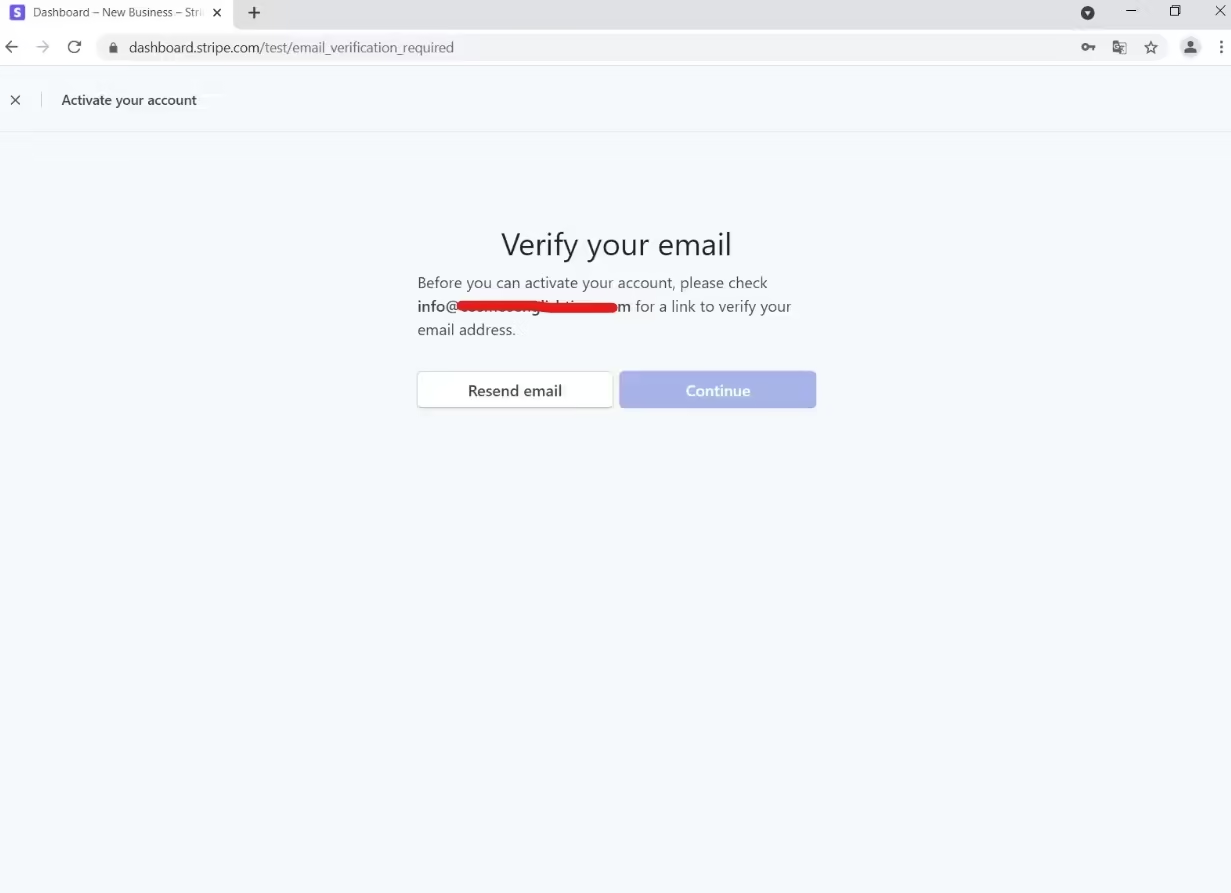
First, you need to verify your email by clicking the verification link sent to your email.
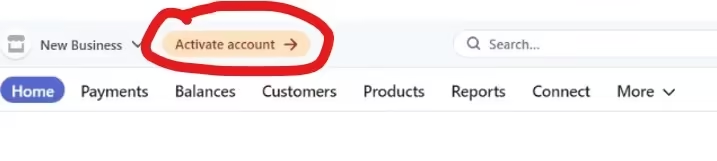
After verifying your email, click the “Activate account” link at the top of the Dashboard.
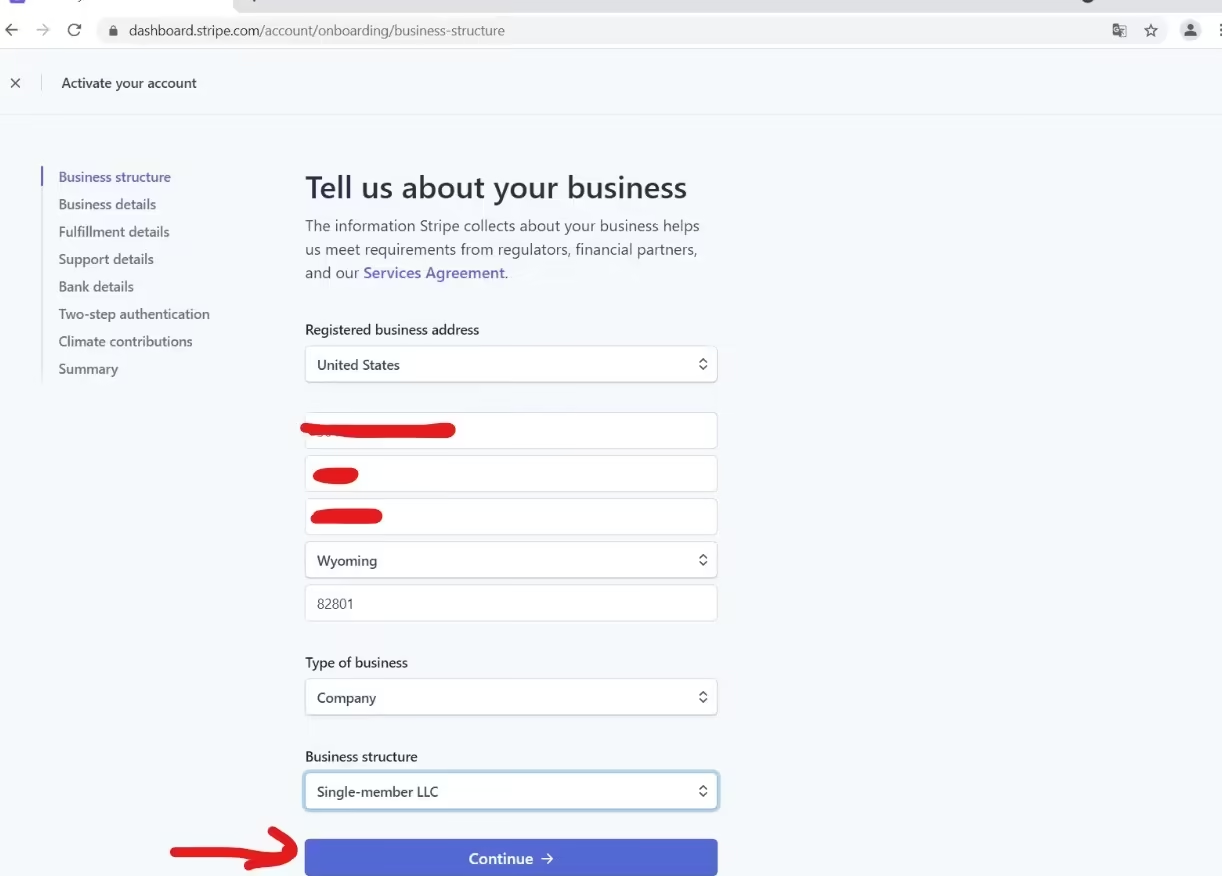
The Registered Business Address should be United States, then enter your company’s address. For “Type of business,” select Company, and then choose Single-member LLC from the sub-section.
In this step, you are asked to enter company details. Enter all information completely. Also, don’t forget to enter your EIN correctly, as Stripe performs an automatic verification process with the IRS database.
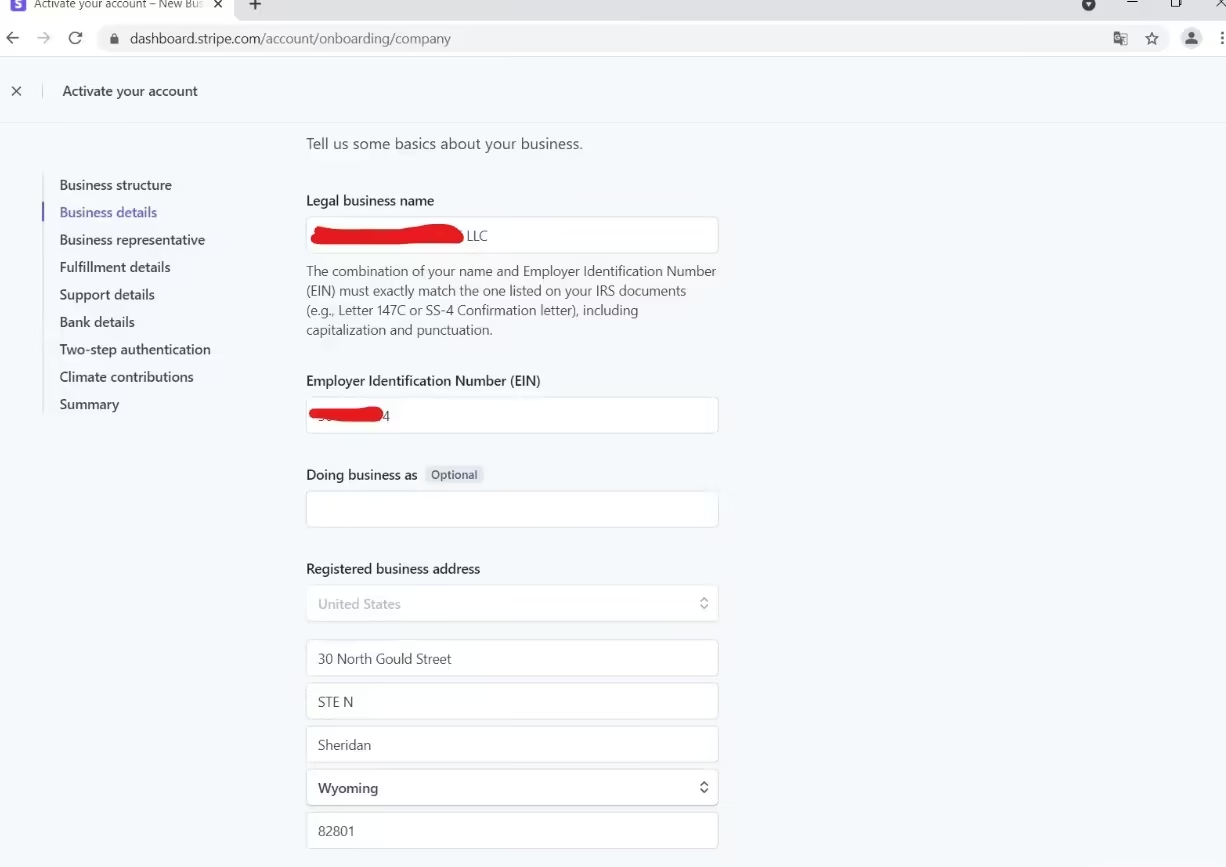
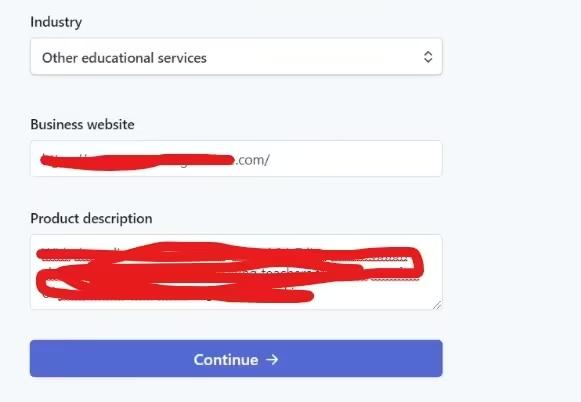
Select your business category (e.g., education, e-commerce, toys, online courses, etc.), enter your website address. Finally, enter a descriptive text in English about your business and products.
This step asks for your personal information as the company owner. Enter your full name, email (can be the same), date of birth, your residential home address (Stripe wants to know where you live, not your US business address), and a personal phone number (this can be your local number with your country code, or a US number). Note: This section is crucial because it can change frequently. Sometimes, a country selection field appears, allowing you to choose your country of residence (e.g., “TR” for Turkey) and proceed to enter your national ID number. Other times, if this direct country selection for ID isn’t obvious, an “Upload an ID instead” option might appear. Click this, select your country of residence (e.g., Turkey), and enter your national ID number. If the country selection for your personal ID is available, enter your national ID. If not, look for the “Upload an ID instead” link, click it, select your country, enter your national ID, and then proceed by uploading your ID document.
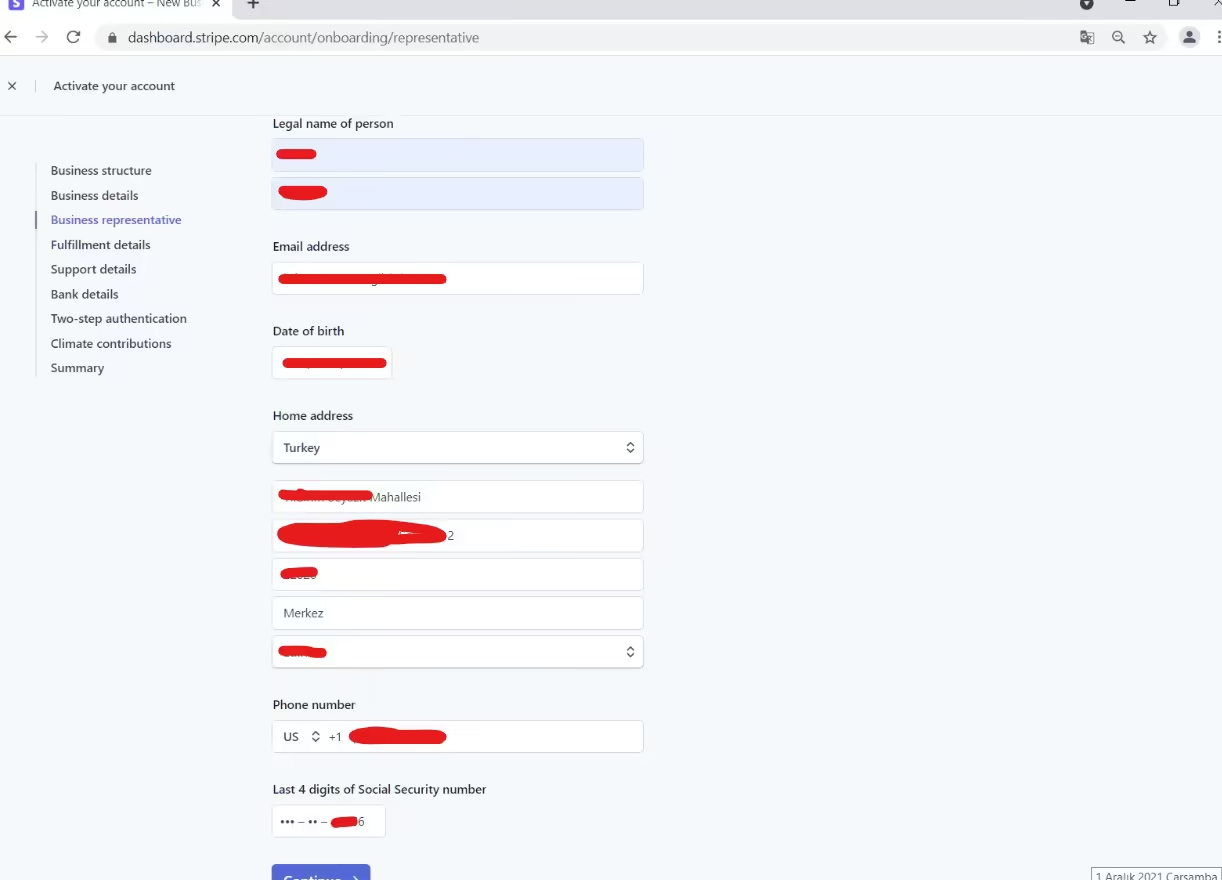
This section is crucial and can change frequently. Pay close attention to how to provide your non-US ID.
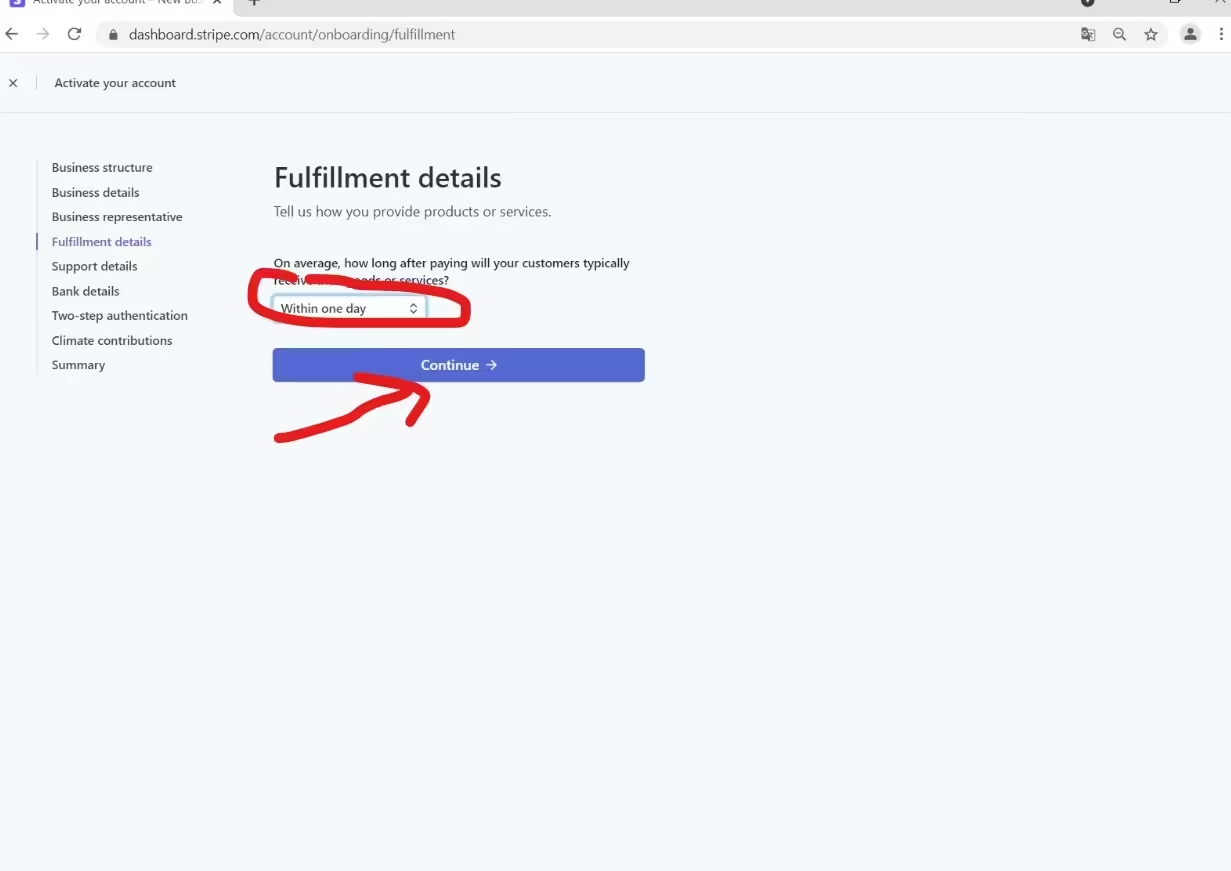
For the Fulfillment details section, select “Within one day” (or as appropriate for your business) and continue.
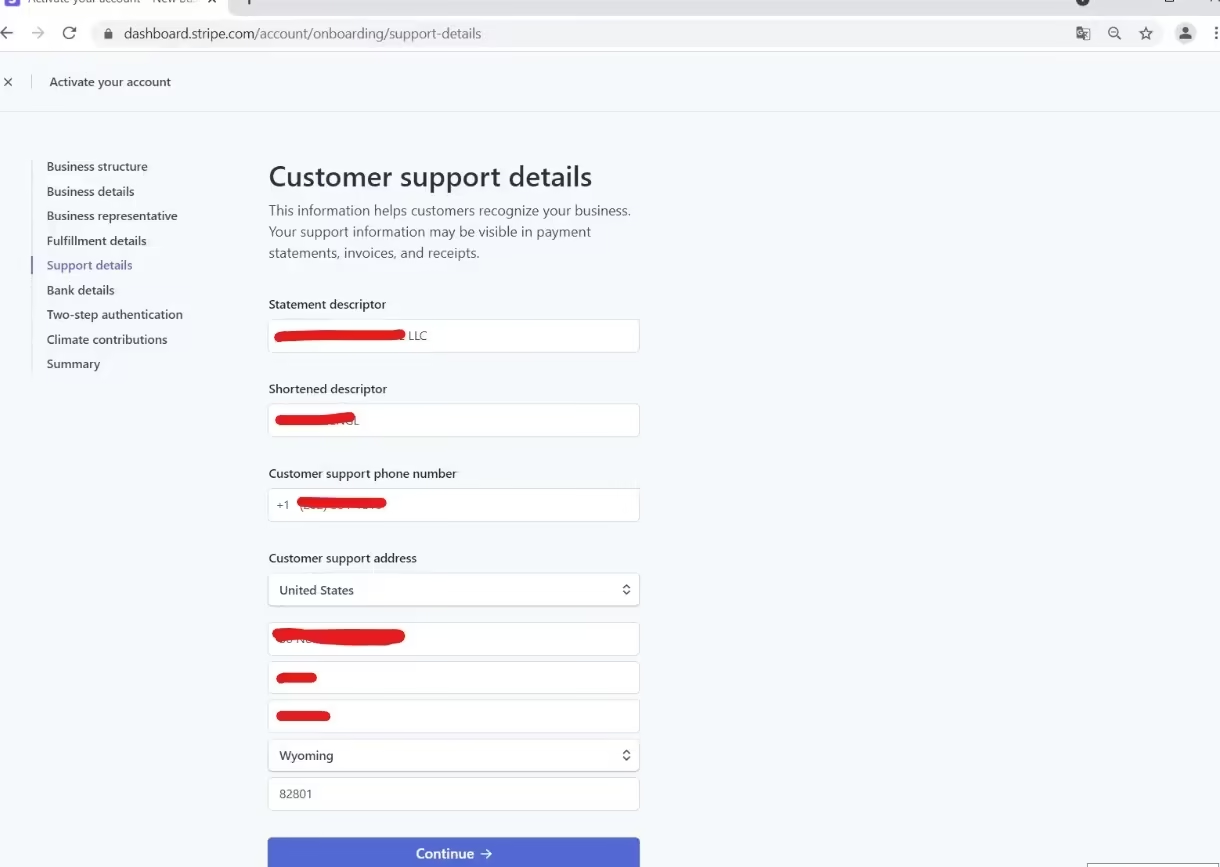
In the Support details section, enter your company name, a description, a US area code phone number (a US phone number is required for this section), and finally, your company’s US postal address, then continue.
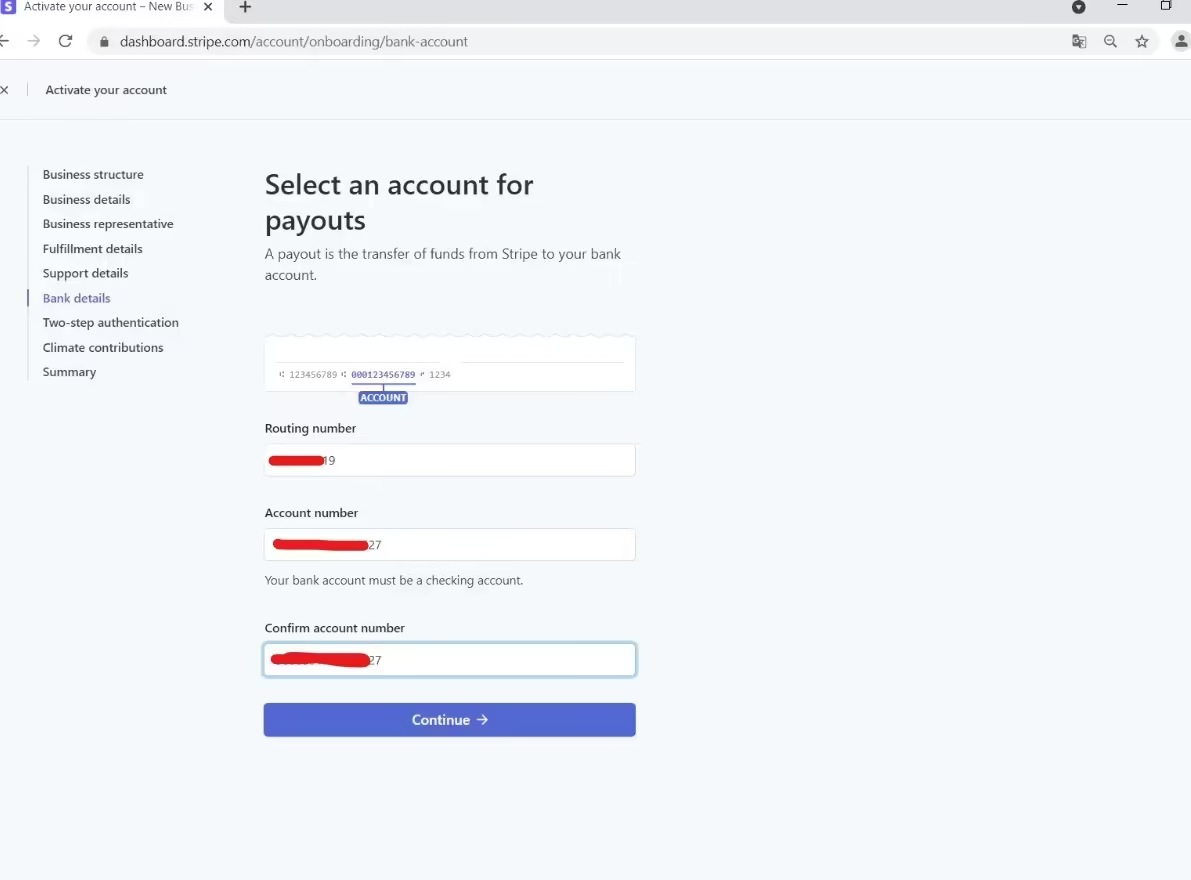
Enter your bank account details as shown below. Enter the account and routing information for either your Mercurybank or Payoneer Business corporate account and continue.
If you want to activate two-factor authentication, you can proceed via SMS or the Google Authenticator app. Do not skip this step, as you cannot finalize the process without completing it in the final stage. Apply one of the two methods and continue.

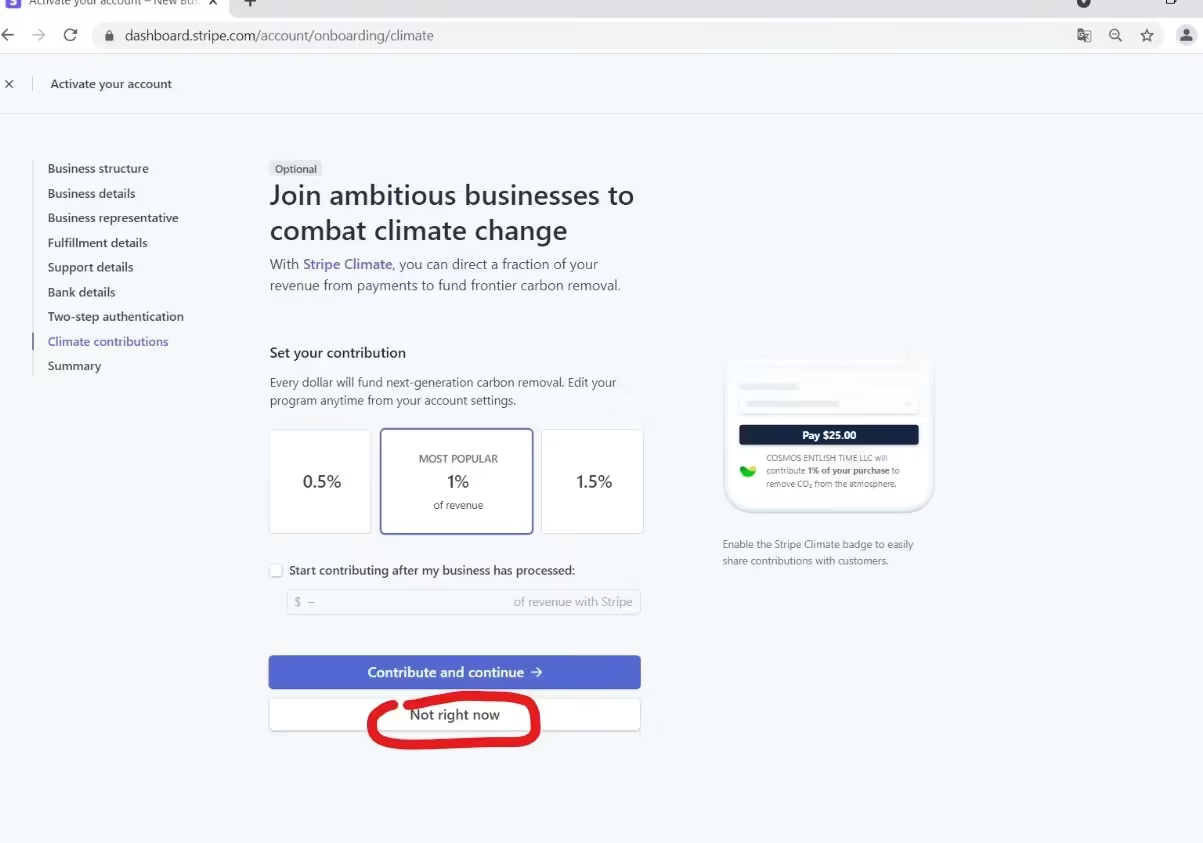
You can skip the Climate Contribution option by selecting “Not right now.”
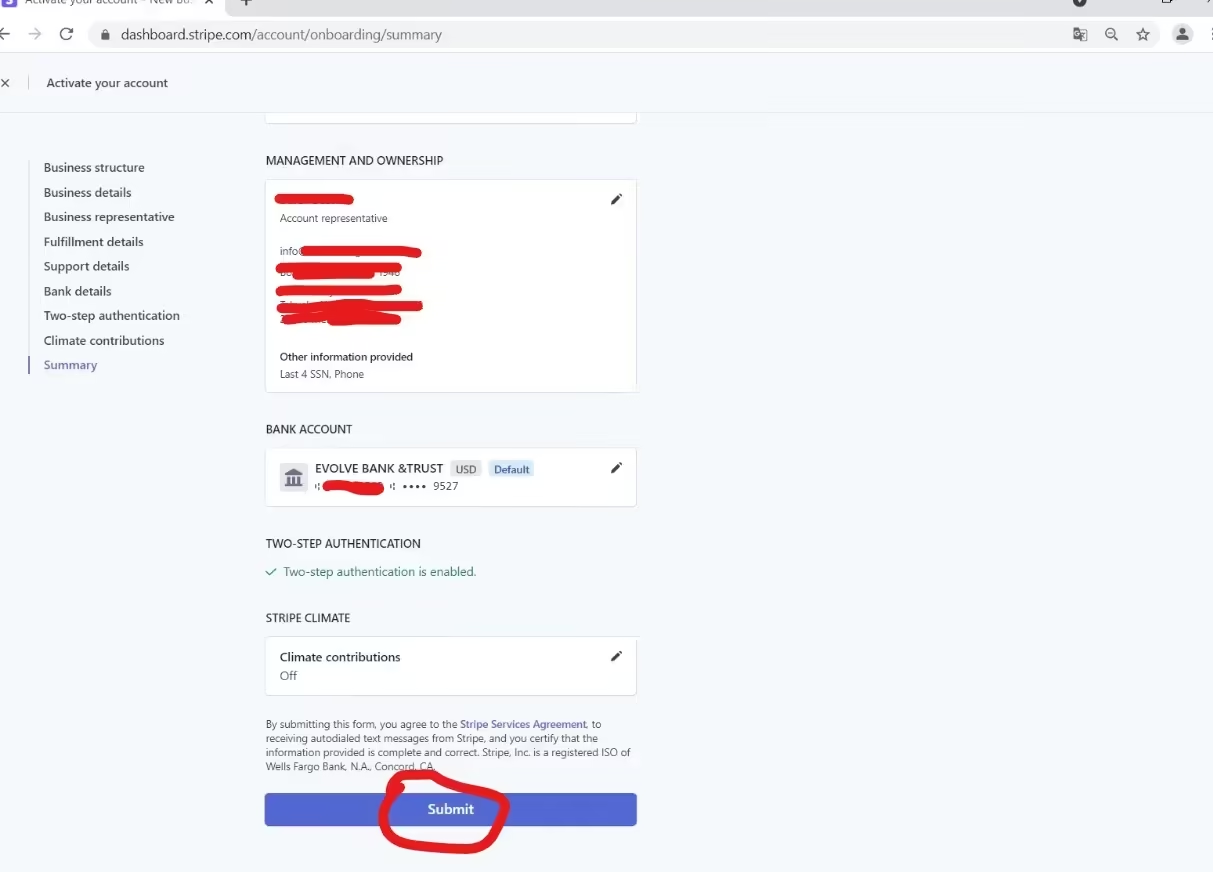
In the final step, you are asked to review the information you entered. Make any necessary corrections and submit your application by clicking the “Submit” button.
Approval Process
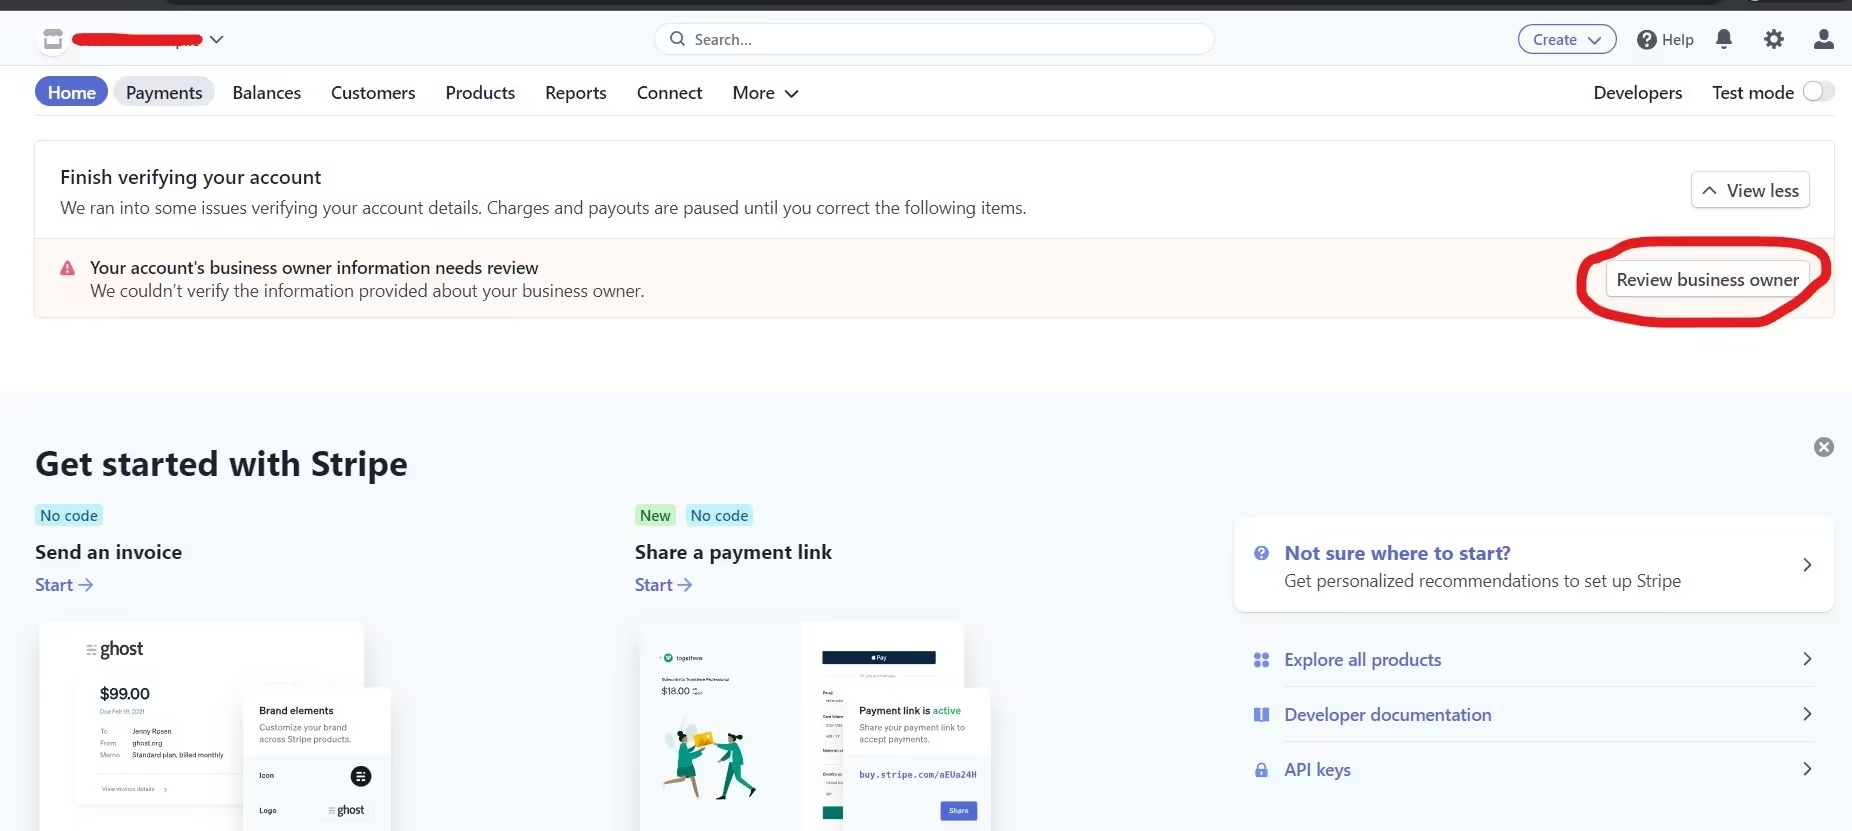
Approximately 5 – 15 minutes after submitting the application, log back into your Stripe panel. You will see a notification at the top of the panel indicating that you need to verify the account holder’s identity. If you don’t see this warning, wait a bit; it will definitely appear. This is because the account is not fully approved until you upload your identity documents. To start the approval process, click the “Review business owner” button.
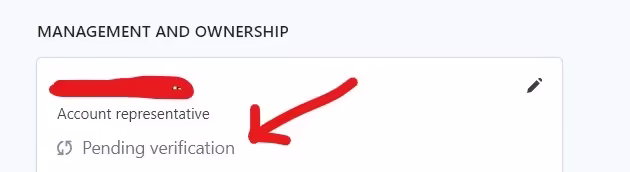
Recall the explanation we made earlier. We mentioned that sometimes the country selection option might not appear in the identity information section. We stated that if it doesn’t appear at that stage, you would need to click the identity upload link. Now, if the field for your national ID number (e.g., T.C. Kimlik No for Turkish users) is active at the verification stage, select your country code (e.g., TR) from the Country Code section and enter your national ID number in the relevant field.
After entering your ID number, you will see that the ownership section is in “pending verification” status. Click the pencil icon next to it and apply the following operations.

Press the “Update” button.

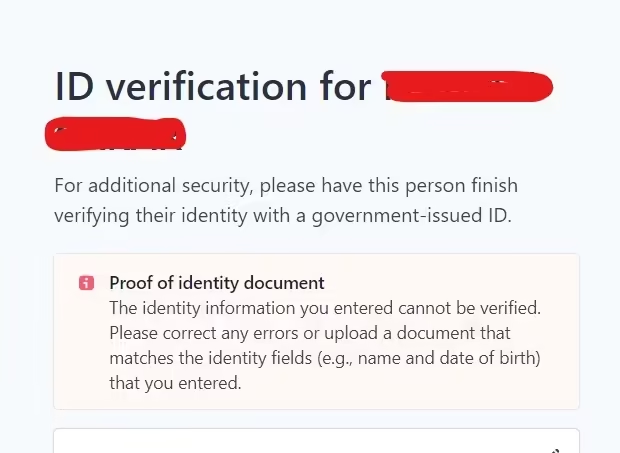
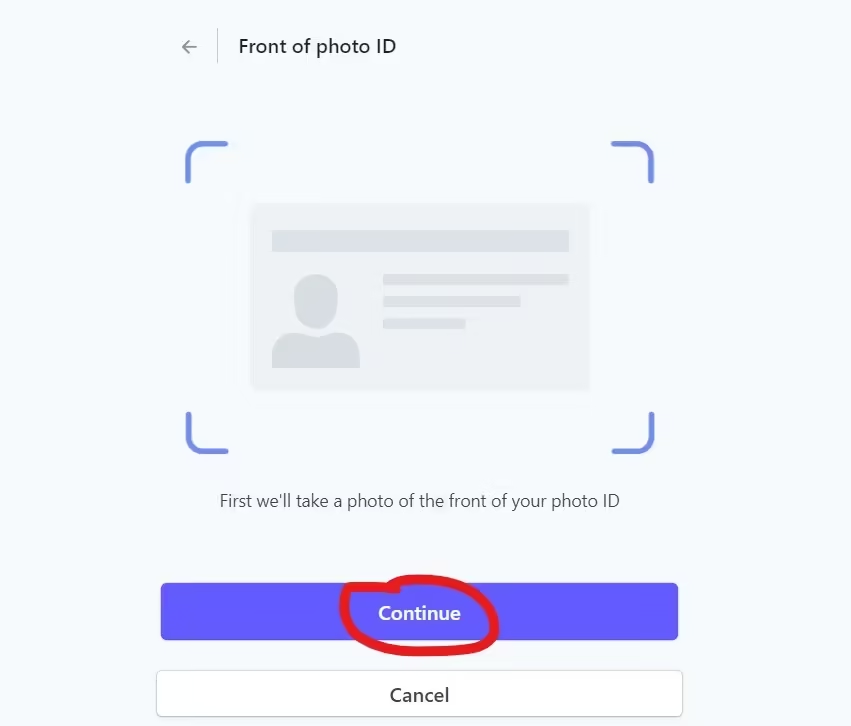
You should now have reached the ID verification section. You will be asked to upload the front and back sides of your ID (or passport) separately.
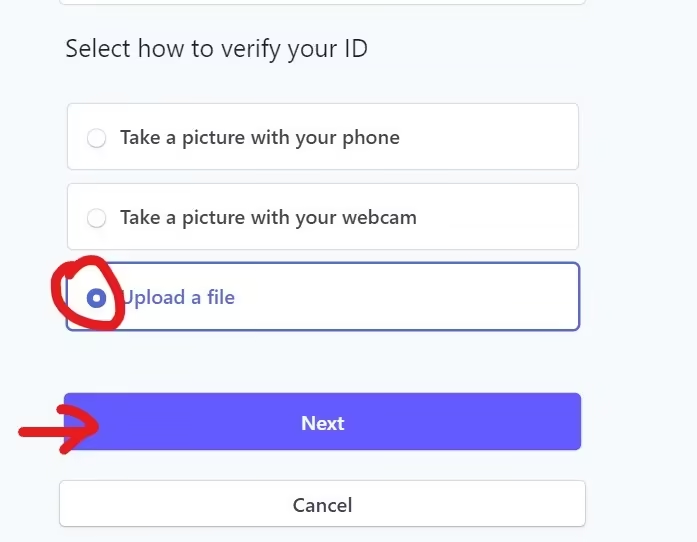
Select the “Upload file” option. You can also do this using your computer or phone camera if you prefer. If you use the upload method here, ensure your ID photos are high quality and legible.
Upload your ID.
If the “Looks good” message appears, it means the photo will be accepted. Similarly, upload the back side.
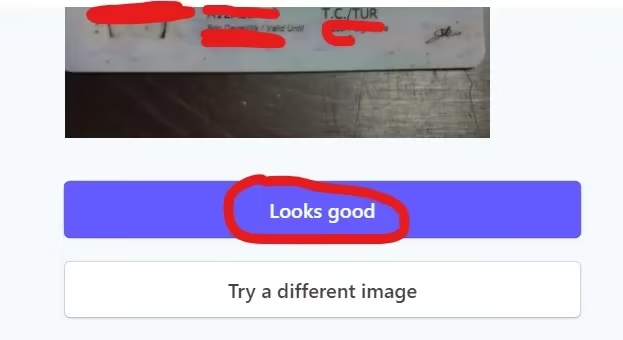
After the upload process is complete, it will go into “pending verification” status. At this stage, do nothing, just wait a bit and refresh the page; you will then see this warning disappear. Once the identity verification is also completed, you will see that your account is now fully approved on the Stripe dashboard page. You will also receive an email within a few minutes stating that you can now receive payments. A message “Your account is now active” will appear in the Dashboard section. From this point on, you can start receiving payments.
Check Company and EIN Verification Status
To check the verification status of your EIN and company, go to https://dashboard.stripe.com/settings/taxation . On this page, you can see that your tax information (EIN) has been automatically verified by the IRS and that the account is verified.
When Does Stripe Make Payouts to Your Bank Account?
After your account is fully approved, you can start receiving payments from your customers. After receiving the first payment, the process of transferring your Stripe balance to your bank account begins automatically. In this process, your bank account is actually being verified by Stripe, and this process will take approximately 5-7 business days.
Once your bank account is verified by Stripe, the money transfer from Stripe to your bank account will be completed. In subsequent processes, payments you collect from your customers via Stripe will be transferred to your bank account after 2 days with default settings.
Stripe Commission Rates
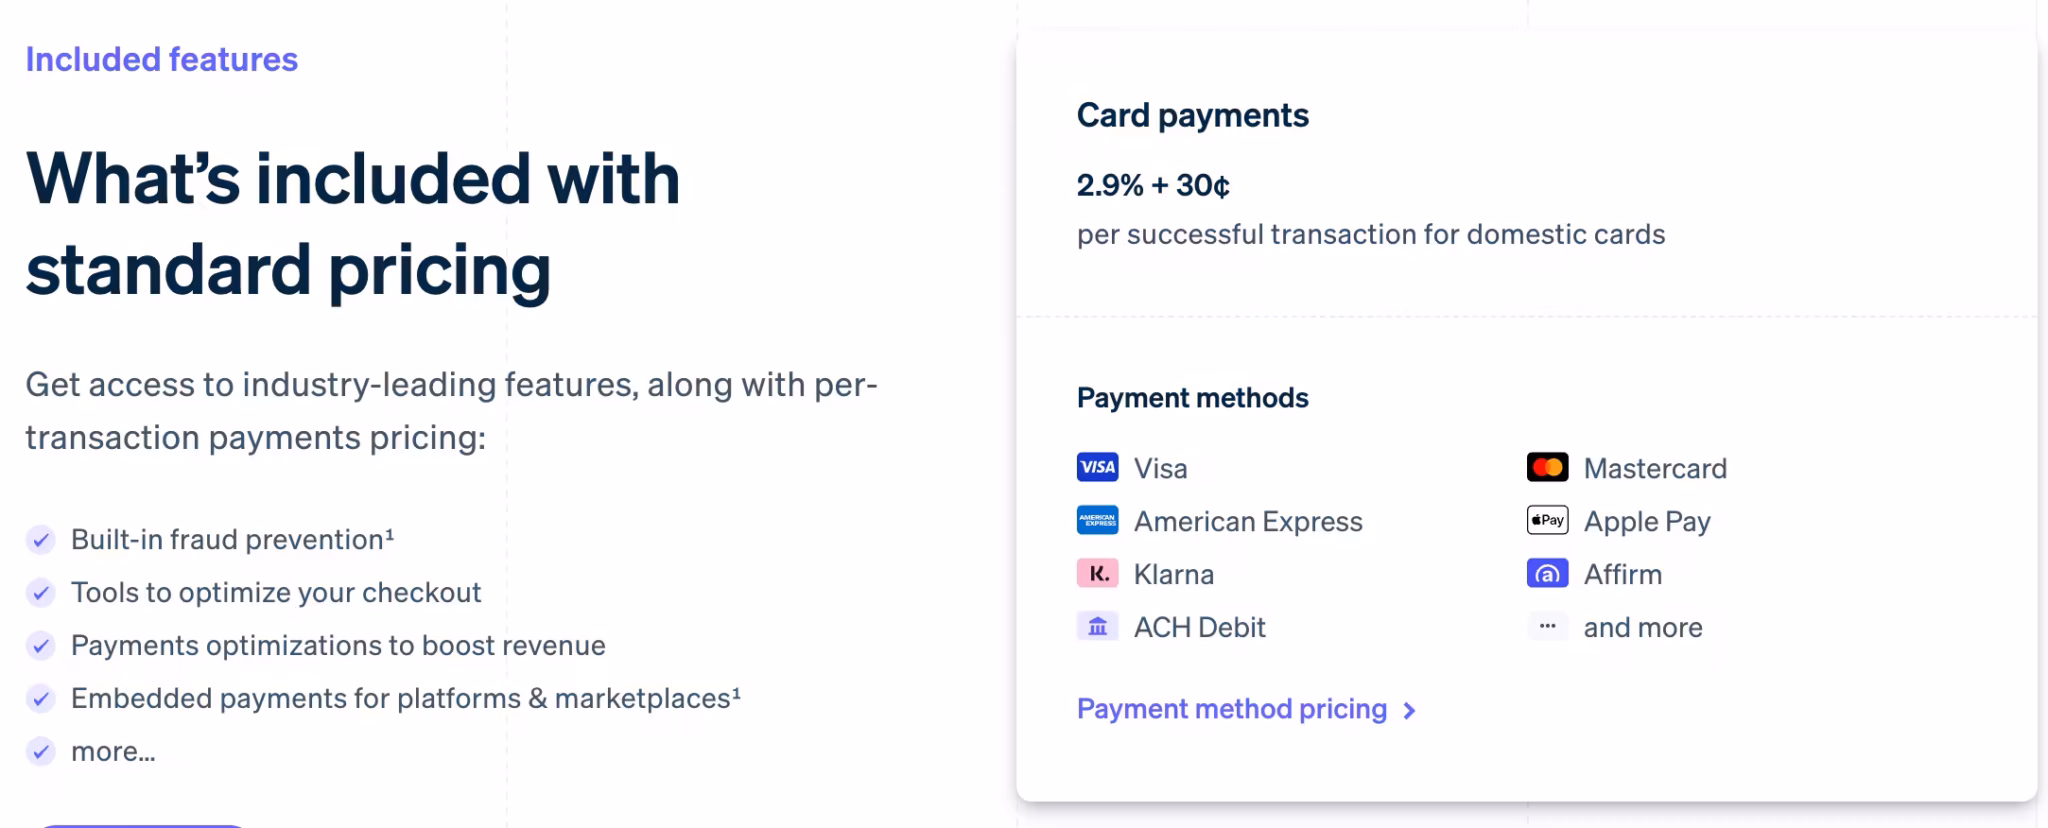
Stripe’s commission rates are quite straightforward, as stated on their own website. Stripe charges a commission fee of 2.9% at the end of each successful order. In addition to the 2.9% commission, Stripe also charges a fee of 30¢ (cents) per transaction. Stripe does not charge any other commissions beyond these.
Frequently Asked Questions
Conclusion
Once you complete these steps thoroughly, you will have access to Stripe, one of the most widely used and secure payment solutions in the world.
The steps and process may seem lengthy, but as of now, this is the most accurate, legal, and reliable method for non-US residents to receive payments through Stripe via a US LLC. Don’t waste your time and money on other alternative and potentially non-compliant methods.
Ultimately, by allocating a starting budget (e.g., around $89 for LLC formation in New Mexico with Northwest Registered Agent through certain providers, plus bank and phone costs), you can form your LLC in USA and confidently launch your new venture and online business with a reliable payment solution. We hope this guide has been helpful for your business. If you have any questions about this topic, you can ask them in the comments section.
Ready to Unlock Global Payments with Stripe?
The first and most crucial step is forming your US LLC. Incbooster, in partnership with Northwest Registered Agent, makes this process fast, affordable, and secure for international founders.
Launch Your US Company NowGet your EIN, US Address, and Registered Agent service included!
Important Legal Notice
Mercury is a financial technology company, not a bank. Banking services provided by Choice Financial Group and Evolve Bank & Trust®; Members FDIC. Mercury Debit Cards are issued by Choice Financial Group and Evolve Bank & Trust, Members FDIC, pursuant to licenses from MasterCard. (Note: This is an important disclaimer from Mercury, good to include as per user's text, even if this page is about Stripe, as Mercury is mentioned as a banking solution).
Stripe is also a financial technology company. Services may be provided by Stripe Payments Company or other Stripe affiliates. Always refer to Stripe's official documentation and terms of service for the most current information.